Showing posts with label Game Room. Show all posts

Monday, May 6, 2013

Shopping for Granite and Carrara Marble

This weekend Matt and I did some of shopping and selected our granite and carrara marble slabs for the Guest Bath, the Master Bath, the Game Room Bar and the Living Room Built-In next to the fire place.  All of the cabinets for these rooms are stained a dark java color.  Here are a few of the cabinets for our Master Bathroom vanity post-delivery but pre-installation. 

 
All of the cabinets in our house are from Starmark Cabinetry that we ordered from a store called Factory Builders Store in Houston.  This is the same brand of cabinets that we used in our kitchen and absolutely adore the quality, finish, and detail that these cabinets provide.  (Oh and P.S., I have not been paid by either of these stores, but if anyone that works there is interested, please don't hesitate to contact me :-) ).  In the Master Bath, Living Room, and Game Room, we are going for more of a rustic look, so we chose the Rustic Cherry wood for the cabinets.  Rustic Cherry wood is different than plain Cherry wood because it shows natural holes and wear in the wood. 


Here


This is the same finish that we used for our kitchen cabinets.  However, we chose the Java stain for the Master Bath, Game Room and Living Room built-in, which is a bit darker than the sample cabinet above.  Java is effectively a super dark brown stain that looks nearly black, but still gives you the richness and warmth of a deep brown cabinet.  Also, it allows you to see the wood grain, which we would loose if we painted the cabinets black.


Here


Here is a closer look at our Master Bath vanity cabinets.


Since we are going for more of "elegant-rustic" look in the Master Bathroom, Living Room and Game Room, we were hunting for a creamy piece of granite with some dark accents throughout.  We found first found this piece of Delicatus Granite that we feel in love with.


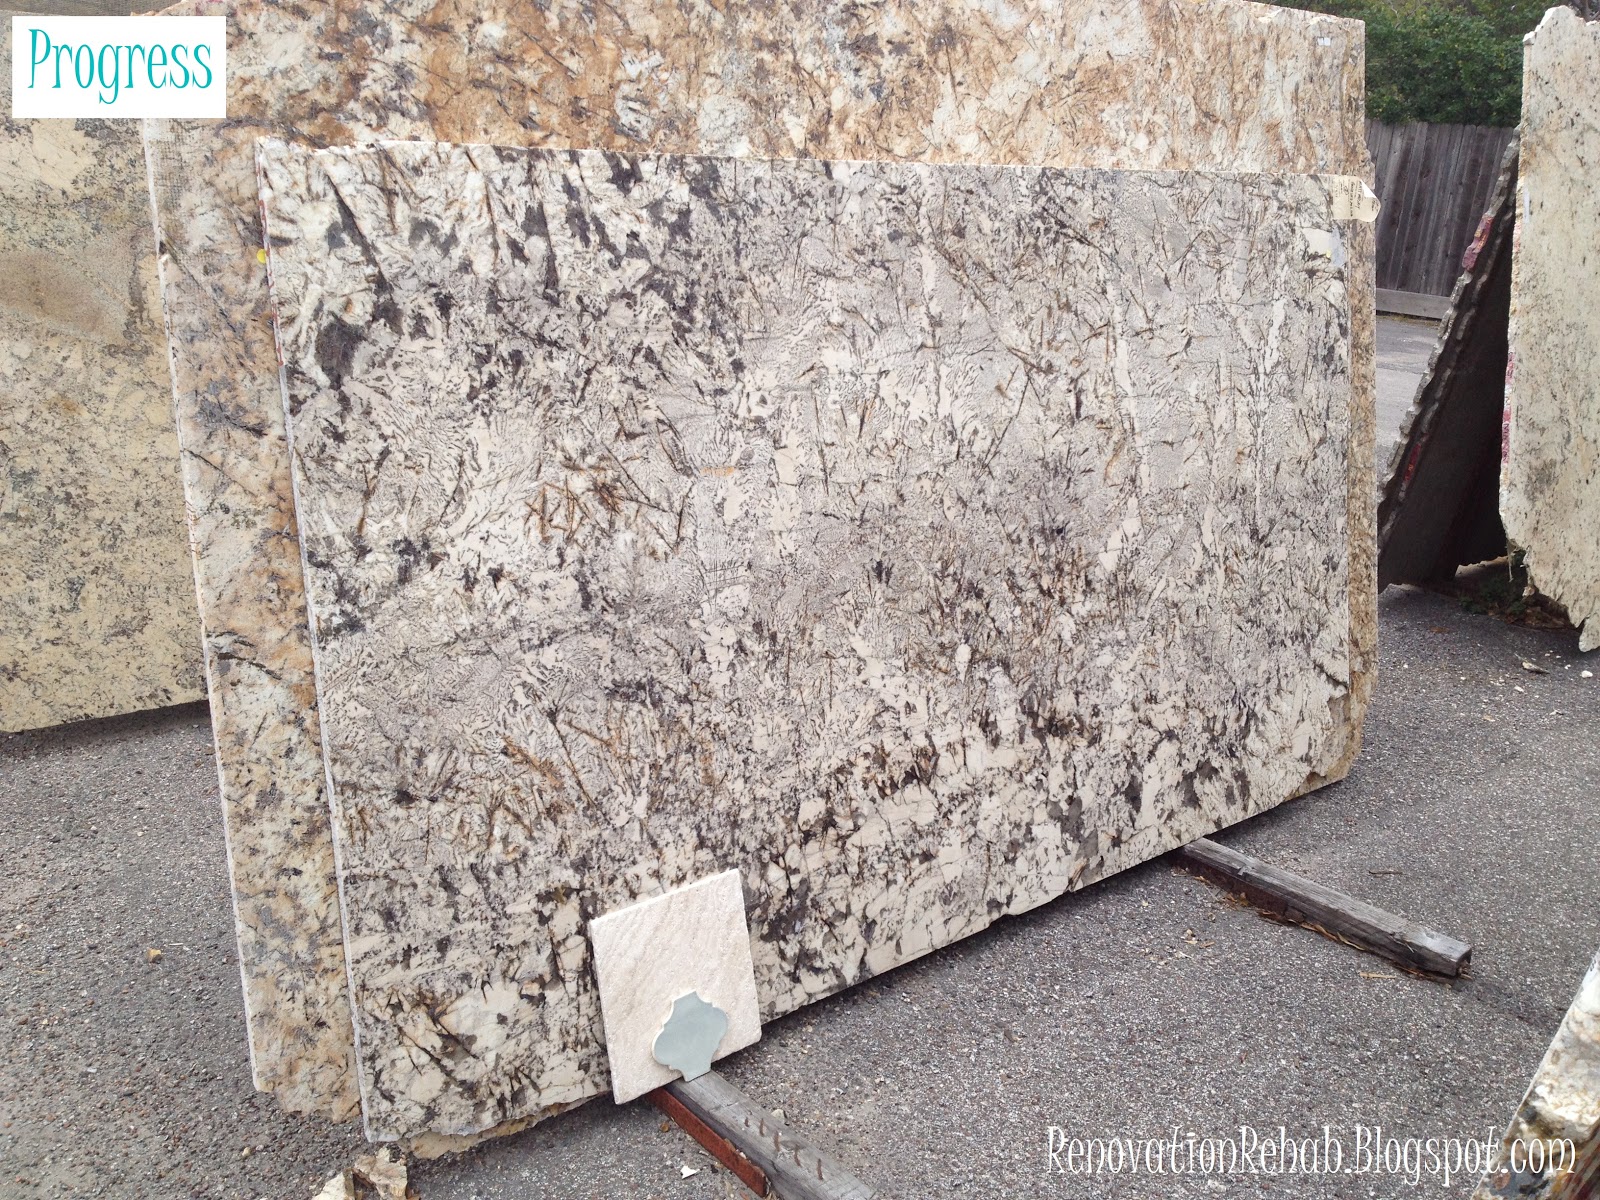
The two pieces of tile in front are samples of the travertine tile and accent tile that we are using in the Master Bathroom.  The colors don't match that well in this picture, but in person they are spot on.  Unfortunately, however, this slab is only big enough for our Master Bath Vanity (it's 10 foot long).  They had another piece, but we didn't like it as much.  Although that was a bit frustrating at first, we quickly realized that we were excited about the idea of having different styles of granite throughout the house.  So we decided to keep hunting to see if we could find something similar but different.  After a bit of searching, we found this slab of Genesis Granite, which has the creams and brown tones that we need to match the built-in cabinets in the Living Room and Game Room, but is distinctly different than Master Bathroom slab. 


However, what makes this slab extra perfect is that it has some tiny specs of Maroon throughout...and for my die-hard Aggie husband, that was all he needed to be sold on the piece.  Next on our list was the Carrara Marble for the Guest Bathroom. We are going for an classic late 1900's early 20th century look for this room.  Here is my inspiration board that I showed y'all when I first revealed the Guest Bathroom plans.

 
As you can see, this bathroom is all about Carrara Marble.  We are going to use it on top of the cabinets and on the floor tile.  After wander through the warehouse, I quickly realized that all Carrara Marble is not created equal and the texture and color of the gray veining throughout the slabs can vary greatly.  It took some searching, however, we were eventually able to find a piece that matched our Bianco Carrara Marble floor tiles perfectly.


The slab was absolutely HUMONGOUS though!  As such, we only need about half of the slab for the guest bathroom vanity.  Since the granite store makes you buy the whole slab, however, we decided that we would use the remaining portion of the slab in the Laundry Room.  As I mentioned last week, I know its kinda crazy to use Carrara Marble in the laundry room...but since we would otherwise loose the remainder of this beautiful slab, we decided to throw caution to the wind and put it in the laundry room.  We are going to try and be careful with it, but I am just going to embrace the scratches or dings that will inevitably show up over time.  But hey, it will mean that it has been well loved and used. Well, that is all for our granite and carrara marble shopping trip.  I hope that you enjoyed it!  Thanks for stopping by and I hope that you have a great Monday!


Thursday, February 7, 2013

Houston We Have Drywall (& a LaCantina Door)!


Hello everyone!  I hope that you have all been fantastic over the past few weeks.  Sorry about being awol for so long, but Matt and I were in Florence for a week for his work's annual meeting and then I have been going 150% at my job since getting back with a big project that has a tight deadline.  However, I had to share with you the exciting progress happening at the house.  The two biggest things are that we now have drywall and exterior doors! Holla!!!!  So let's take a tour of the casa to see how she looks with walls and doors shall we?
 
First I have to show you the super cool La Cantina door that we added that I first talked about here.  This door separates the living room from the back of the house and looks like a wall of french doors.


However, with the flick of a few locks and tiny bit of pushing....the doors completely fold-up to bring the outside in. Can I getta "TAH-DAD"?!?!?!


I am here to tell you that these bad boys are AWESOME!!! I love them because they literally double the size of the our living room when they are open. We are going to have some serious entertaining happening with these guys during the 8 months out of the year that we have good weather in Houston.  Here is a video of them in action. My commentary does not do justice my super cool happy dance that was happening behind the camera.


So now that you have seen the doors in action, I want to take you on a tour of the house with drywall.  Here is the floor plan of the downstairs, so that you can see the placement of the rooms.


Here is the view into the living room from the back patio.  The wine room is on the right under the stairs, the dining room is on the left of the door, and the entrance to the kitchen is in the left corner of the picture.


This is a view standing with my back to the wine room and looking towards the backyard.  Please excuse the disastrous landscaping (or complete lack there of) because all that will be addressed once we get finished with the remodel.
 

This picture is taken from the middle of the living room so that you can see the dining room.  It is crazy how much bigger everything looks in person once dry wall is up!  I guess it is difficult to judge the size of a room when you only have the studs.  You can also see our front door.  It is all wrapped up for safe keeping...but when the plastic is gone, it is beautiful.  As you can see, it is a similar style to a lot of the door I liked here. I love all the natural light that the windows and sidelights bring into the house.  And it will be even brighter once the protective film is removed from the windows.  Oh I can't wait!!!
 

This next picture shows our master bedroom.  It was a little difficult to photograph with my Canon Elf, but at least you can get a general idea of the room's shape.


Now onto the master bathroom (A.K.A. Jenn's happy place).  This is a view into the master bath from the master bedroom.  Here you can see the closet is in the back and the walk-in shower on the right. The tub will live to the right of the shower and our vanities will live on the left wall opposite of the shower.
 

This is a picture of the inside of the master closet.  You can't tell much from the photo, but it is 13' long by 10' wide.  I will show you my master plan for the master closet in a later post.


Here is another view of the back wall of the master bathroom. As you can see, the shower will be on the left side of the wall and the claw foot tub will be on the right under the window. We have his and her shower heads and body sprays, along with a rain shower overhead.  Matt gave me so much flack about having a "his-and-her" shower...but I think he will love it once it is all said and done.


Here is a close-up of the shower layout.  Oh boy, oh boy, oh boy!!!  This makes me giddy like a school girl!


This is a close-up of the wine room under the stairs.  We are going to have wine shelves in the recessed space on the right and on the back wall. I will show all the details in a later post.


Now we are going to head upstairs.  Here is the floor plan for the second floor so that you can get your bearings.
 

The first thing you see when you head up the stairs is the study.  We will have built-in cabinets and a desk along the back wall.


Next we head into the revised game room.  It's amazing how far it has come since we blew out the front wall.  This is a view from the back corner of the room looking towards the study, which you can see through the door.


Here is another view of the game room from the front side of the house.  We are going to add a built-in bar in the nook on the left.  And through the door, you can see the entrance to the laundry room.  I showed you some of my ideas for the laundry room here.


This is a view of the hallway leading to the back of the house.  To my left is the study and to my right are the stairs, game room and laundry room.  As you walk down the hall, the first door on the left is the entrance to the guest bathroom, the first door on the right is my wrapping room (which is not labeled in this picture), the second door on the right is Bedroom 3 (A.K.A. the "Blue Room"), and the final door in the middle is the entrance to the new bedroom above our master (Bedroom 4).


Here is a picture of Bedroom 4. It is directly above our master bedroom, so is basically identical.
 
 
When you turn around and leave Bedroom 4, you are back in the hall heading towards the study and Bedroom 2 (A.K.A. the "Teepee Room"). As you head down the hall, the first door to my left is the entrance to the Blue Room (which you can't see in this photo) and the second door to the left is my wrapping closet.  I talked about my initial plans for the layout of the wrapping closet here and here.  The first door on the right is the guest bathroom, followed by the study and the Teepee Room.
 
 
Here is a pitiful little picture of part of the guest bathroom. We will have two vanities on either side of the window and to the right are the shower and toilette. I need to invest in a super wide lens so that I can get better pictures for everyone!
 
 
After you exit the guest bathroom and enter the study facing the Teepee Room, this is the view you will see.  To my left are the stairs and to my right is the study.  Directly in front of me is the entrance to the Teepee Room.  Two closets flank the entry into the Teepee Room.


Here is what the Teepee Room loooks like on the inside.  It is a long (23') and narrow (11') room with an arched roof.  This will likely become our kiddo's game room with all sorts of fun murals.  It just feels like a place you want to play when you go in.  I also added built-in storage into the eaves...cause hey, if there is a possible open space, I will use it!  Our builder makes so much fun of me for that - but trust me, we will love all the additional storage at some point down the road, I just know it!  We will have doors on the front of the opening that will look like wainscoting so they won't be so obtrusive. 


So that finishes up the tour of the casa with dry wall.  Also, thank you so much for stopping by, I hope that you liked seeing the progress!  Have a wonderful day!!!
post signature

Tuesday, December 4, 2012

Room With A View

We are continuing to make major progress at the house, which is extremely exciting! The crew has extended the first floor's exterior wall, removed the old dormer, and made a HUGE hole in the roof where the new large dormer will live. You can see the floor plans for the remodel here and here. As a reminder, the picture on the left is the front of the house before we started the remodel. And the picture on the right is where we are currently...what a difference!


This remodeling business is not for the faint of heart. You can see in the picture above that the crew has also removed the old cedar siding above the garage, which will be replaced with Hardy Plank. Here is closer view of the new exterior wall and the hole for the new dormer.


We extended the first floor's exterior wall in order to relocate the stairs (the blue prints are here and here). We are replacing the front door and will add side lights. We are also able to put in two large windows in the dining room. In the picture on the right, you can see the location of the new front door (the hole on the left) and the placement of the two dining room windows (the two large holes on the right). And the picture on the bottom is a close-up of the location of the new dining room windows.


Here is some of the carnage from the demo…these used to be the old single-pane windows in the dining room. Can't wait to see the new ones!


Now let's step inside. The picture on the left is the dining room before the extension, and the picture on the right is the dining room and entry after the extension. You can see where the old exterior wall used to be based on the floor in the dining room and entry. The walls in the middle of the room are two temporary walls (which are currently supporting the second floor) and will be removed.


Now, let's chat about the new dormer. We are enlarging the dormer for two reasons. First, the room where the dormer is located is the game room. Before the renovation, the game room was a large room measuring approximately 15' by 22'. However, the front third of the room was not usable space because the roof is angled (which makes for a very low ceiling in the front third of the room). This effectively made the room 10' by 22' (super long and skinny). Enter new dormer (and see the blue prints here). By adding the new dormer, not only are we are able to extend the exterior wall of the game room five feet (which lines up with the extended first floor exterior wall and increases the game room to 20' by 22'), but now we will have 8 foot ceilings throughout the game room (which effectively gains us 10' in the room – the 5' extension + ability to use the 5' of the previously unusable portion of the room). The pictures below shows the game room and the angled roof. The picture on the left is looking into the game room from the door and the picture on the right is taken inside the game room back looking towards the door.


On a side note, the walls of this room used to be covered with brown wood paneling and some sweet navy blue wall paper with a vintage colonial theme. Unforuantely, I don't have a picture, but the wallpaper below will give you an idea (just picture it with a navy blue background and add colonial drums between each of the eagles). When we first moved into the house, we removed the paneling and wallpaper, added the crown molding and the new window seat, painted the walls with Ralph Lauren suede, and painted all the trim dark brown. It was pretty painful to see all that work destroyed. But hey, sometimes you have to take a step back in order to move forward.


So back to today. The picture on the left shows the view of the game room from the new stairs. And the picture on the right gives you an idea of game room's old footprint and the space that the new dormer will create.


Here are some more pictures of the game room from the inside. I've heard of open concept…but this is rediculous! Sorry, I couldn't help myself.


These pictures show the game room looking back towards the stairs from the far wall of the game room. The picture to the left is before any demo and the picture on the right is today. You can see where the old door used to be located and where the new entrance will be in the picture on the right.


Here are our new stairs in action!


And some more views of the front yard from opening of the new dormer.


Oh, and here is a close-up of our lovely dumpster. We have unloaded this bad boy about 15 times already!


We'll be back soon with the progress pictures of the new guest bedroom!

post signature

LinkWithin

Related Posts Plugin for WordPress, Blogger...