Hello world!!! We are finally back after a long hiatus due to extreme amounts or work and catching the flu. No good! But I am on the mend and the fiscal year at work is over (for all you attorneys out there, you know that means a mad dash to make sure you hit your hours requirements, which equals no life) - Oh Happy Days! So now that that's over, let's get back to the fun stuff shall we? We have officially been in the house for a month now. I seriously can't believe it! September was here an gone before I blinked my eyes. In honor of our one month anniversary, I thought I would show y'all some before and afters to see where we started and where we are now. This is coming from the advise of my darling friend Melissa, who oh so kindly pointed out that I am good about showing the "hey, here's this new idea that we're starting" but never following up with the "and here's out it turned out". So if you're out there and reading Mo, this one's for you babe! As many of you know, our house was built in 1967 by Ben and Rose Green as their family home where they raised their five daughters and welcomed husbands and grand babies. They lovingly and meticulously maintained the house for the 40 years that they called it their home. As soon as Matt and walked into the house, we fell in love and knew that this was the home for us. However, for as carefully as Rose and Ben maintained their home, they never really updated anything and it stayed in somewhat of a 1967 time capsule. Here is what the downstairs living room, dining room and kitchen (you can see a tiny glimpse of its blue walls to the left of the fireplace) look like before with all of their wonderful 1967 wallpaper and dark wood paneling:

As I have said before, this was nice and 1960's cute, but unfortunately not our style. For a temporary fix when we moved in, all of the woodwork was painted white and the walls were given a neutral tan color...and the dining room turned into this:

Big improvement! But now let's fast forward to today and check out what she looks like after we gutted the room, pushed the front wall out five feet, added wainscoting, crown molding, new paint, new windows, a new chandelier, recessed lights, installed reclaimed hardwood floors to the extension and refinished all the floors a dark walnut color:

I personally love it! As a disclaimer, I took all these photos with my IPhone, so the paint color is a bit off. The tan walls do not read quite as dark in person. After a month, my big excitement is that this room is 100% box free. However, we have a lot left on the ole "To Do" list:
New furniture
New rug
Purchase and install plantation shutters
Add artwork and accessorize
With respect to the furniture and rugs, these were hand-me-downs from Matt's parents. Although they are in great shape and super nice, they don't really match the style and color scheme that we are going for in the room. Now let's head through to the left of the dining room and move into the kitchen! Here is what she looked like when we bought the house:

Although I though that the kitchen was absolutely adorable and super 60's kitsch, the cabinets were not very practical, the white tile counter top was impossible to keep clean and the faux brick linoleum floors were past their prime. So here is the kitchen now after the remodel:

Although we kept the same footprint, we completely gutted the kitchen and added all new wood floors, two-toned cabinets, appliances, sink, faucet, hood vent, travertine back splash, granite counter top, a breakfast bar behind the stove with built-in storage, two-tone dental crown molding, paint, recessed lights throughout, and french doors in the breakfast room. Whoooo, that's a lot! And we are super thrilled with the results. We decided to keep the same footprint in the kitchen because it is an extremely wide space, with lots of count top/workspace, so there is plenty of room for multiple people to prep, cook and hang out...and bonus, we didn't have to move any walls (and a massive fireplace that is on the other side of the left wall). Score! And here's the before shot of the breakfast room:

And here is the after:

My favorite part of this space is definitely the french doors. They let in so much natural light into the kitchen and once the back patio is finished (which you can see through the doors), we will be able to open these doors and move easily back and forth between the indoor and outdoor spaces. The "To Do" list is not too big in the kitchen/breakfast room, but it's still there:
Bar stools for the breakfast bar
Small table and chairs
Artwork and accessories
Dummy handle for the left french door
Add missing molding piece to the left of the last piece of travertine above the stove
And here is another view of the kitchen from the back corner of the breakfast room looking out towards the living room and the dining room to help orient you to the house:

Now we'll head out of the kitchen and into the living room. Here is a view of the old living room from the kitchen looking back towards the front door and the old stairs. This picture was taken after all of the woodwork was painted white and the walls were painted a light tan:

And here is the same view today:

This part of the house went through the biggest change layout wise. We pushed the front of the house out five feet, which allowed us to add an entrance into the house from the garage, move the location of the stairs (which completely opened up the space...for reference, the left side of the staircase used to be where the house ended), and close off the doorway leading into an old hallway outside of the old master bedroom. Here is another view of the living room before the remodel looking from the opposite side of the house back towards the front door and dining room:

And here is the after:

It's amazing how moving the stairs made the whole space so much more airy and open! The pictures don't really do it justice, but trust me when I say it is a huge improvement! In addition to moving the walls, we refinished the fireplace with dry stack limestone, removed the hearth from the fireplace so that it is now flush with the ground, added cabinets and storage to the right of the fireplace where the wood storage used to be, a new chandelier, recessed lights throughout, crown molding and baseboards throughout, refinished the wood floors, an all new staircase (and staircase accessories), and new front door and side lights. As you can see, we kept with the same color scheme of dark molding/trim and neutral walls. You can't tell from the pictures, but the wall paint is Ralph Lauren Suede, so it gives a nice subtle texture to the otherwise simple walls. Now for the next-to-last view of the living room (have I lost you yet?). Here is what you saw before when you walked into the front door and looked out towards the sun room/back yard:

And here is what you see now:

Our La Cantina Doors! We love these things!!! These things are great because (as I showed you here) they fold on themselves to the left so that the wall disappears and we are able to completely open inside of our house to the outdoors. You can also see that we removed the old sun room and added a large patio. The plan is to have outdoor lounge furniture in that space (couch, chairs, etc.). That way, once we open the doors, we will more than double the length of our living room with the combination of outdoor and indoor living. We think that it is so cool and it is going to be AWESOME for parties!

And here we are to the last view of the living room looking back towards the kitchen and the backyard. Like all the other rooms, the living room/back yard have quite the "To Do" list:
New furniture and rugs
TV for above the fireplace
Some sort of decorative cabinet to hide said TV
Mantel for fireplace
Clean and refinish inside of the fireplace
Artwork and accessories
Cabinet and drawer pulls for the built-in
Finish the wine room
Furniture for the patio
Add pergola above back living space
Plants for the back yard
So now let's move onto the master bedroom. The footprint of the master bedroom did not change much, other than moving the entrance and removing the old closet. Here is what the master bedroom looked like after getting its coat of tan wall color and white wood work:
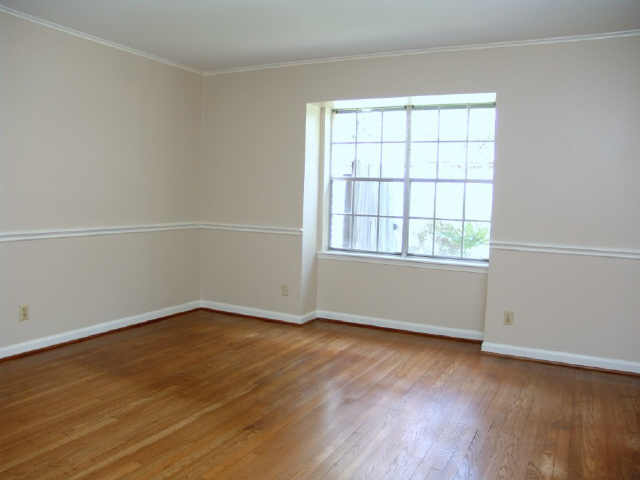
Although we didn't change the foot print, we did quite a bit of work in the master bedroom. Here is what she looks like today:

So here, we added new crown molding and baseboards, removed the chair rail, refinished the floors, added recessed lights and a new fan, painted the walls a soft teal color with our favorite Ralph Lauren Suede paint (the color isn't reading right in this picture, but you can see how it really looks a few pictures down), and installed new windows (although you can't see them behind my super DIY temporary curtains made from a king bed sheet and a significant amount of painter's tape...but they have been up for two weeks now, so I think I did good! Just keeping it real folks!). Now here is a view of the master bedroom before the renovations looking from the back of the room towards the front of the house.

That used to be our master closet. Although it looks large in the picture...in reality it was tiny! So as I mentioned before, Matt used that closet and used all the other closet throughout the house. Fair trade! And one of my favorite things about this picture is the small round face plate on the wall. That was actually an original 4-prong phone jack from 1967! I had no idea what it was and my mom had to fill me in. It's crazy, because we don't even have phone jacks in the house now! How the times have changed! Here is the same view of the master bedroom today:

The paint in this picture reads a lot more true than the previous one. Here you can see that we also added double doors into the master bedroom and you can see the master bathroom in the background. We went with the same dark trim and woodwork in our bedroom as well. I love the combination of the dark trim with the soft blue walls. It is very relaxing. Here is out "To Do" list for the master bedroom:
Purchase and hang plantation shutters (shocking!)
Change out switch plates and plugs from builders white to oil rubbed bronze
Finish unpacking boxes
Hang artwork and accessorize
Now onto the master bathroom. This is probably the biggest transformation of the entire house and most definitely one of my favorites!!! Here is our master bathroom before the renovation (please excuse the poor picture quality) - first we have the master vanity (taken from the hallway looking into the bathroom with the master bedroom on the right):

And here is the view of the master bathroom from the master bedroom with the vanity to the immediate right:

The bathtub/shower was behind the wall. This space was TINY!!! I could stand straddling the shower and touch both the exterior wall and the shower wall. There was no room for two people to get ready in the morning, so Matt used this bathroom and I used its twin upstairs to get ready. You can't see from this picture, but there was a 6 foot wide hallway to the left of the bathroom and a 10' by 10' "study" (but really, more like a glorified closet) on the other side of the wall from the toilette. The first thing I thought when we saw the house was that the hallway and 10' x 10' study were not usable space for us, so we blew out all the walls and created a large/proper master bathroom and walk-in closet. Here is the master bathroom today:

I'm telling you, when I walk into this place all I turn into George Costanza and constantly exclaim "Xanadu!!!" It is such a complete 180 from what we had before! Once we moved the walls, we added a two person shower with double shower heads, body sprays and a rain shower; a claw foot tub; large 18"x18" travertine tiles on the floors, travertine tile "wainscoting"; a large double vanity with granite counter top; a new large window, a massive custom mirror (which you will see in the next few pictures); crown molding throughout and new paint. Oh it makes me giddy!!! I don't have a good picture of how the vanity looks today, so here is an older one (before the mirror frames were painted) to give you an idea:

I love the gooseneck faucets and handles! And the detail in the sinks is super cool. But the best part is that we have enough room for Matt and I to both get ready in the bathroom at the same time. It is wonderful!!! And here is how the mirrors look today (mess and all from getting ready this morning, also with a little Elvis-Matt in the background..Hey Hey!):

And here is our lovely "To Do" list for the master bathroom:
Hang second vanity light
Hang chandelier above the claw foot tub
Finish the trim around the mirrors and remove painter's tape
Install hooks or towel bar to hang towels (so they're not on the shower)
Paint hand mirror oil rubbed bronze
Floor mat for the tub
Hang artwork and accessorize
And last but not least on our downstairs tour is the master closet. I showed you my "Master Plan" for the closet here. This little beauty is also one of my favorite changes in the house because all of Matt's and all of my clothes fit into one closet! Woohoo!!! This is the first time that has ever happened and this is the first time in six years that all of my clothes have lived in a single closet. It makes getting ready in the morning SOOOOOOOO much easier! Now I warn you, the closet is still in the unpacking and organizing phase, so it is a bit of a mess. But hey, this is where we are after one month and hopefully by month two, I can show you a beautifully organized closet. So for now, here is the left side of the closet:
The left wall of the closet holds Matt's clothes and a mirrored accessories cabinet (that behind the two mirrored doors on the far left). The accessories cabinet is only about 3 inches deep because we had to steel some room from this closet for the wine closet, which is on the other side. In the middle we have an island with a bench on the end. And the back wall is one giant built-in. My boots and flats are on the left, a chest of drawers in the middle with cubbies above, and my heels are to the right, which you can see in this picture of the right side of the closet:

This side of the closet houses my clothes. You can see the rest of the vanity and to my right are more shelves that hold all of Matt's shoes and accessories. I love this closet! It makes me giddy every time I walk in! Yippy, closets are so fun!!! And now for the final "To Do" list for today:
Hang chandelier above island
Finish unpacking boxes and organize/purge clothes
Add pulls to the chest of drawers, accessories closet doors and hampers in island
Make a covered cushion for the seat on the island
Install butcher block counter top on island
Finish off the inside of the accessories closet to hang/organize accessories (more to come on this fun project)
Phew, that is a lot of information for one day! If you stuck around till the end, congratulations and thank you! I will try to post the before and afters for upstairs tomorrow. But before I go, one think that I mentioned on the very first post of the blog was that our goal with this remodel was to update the home to bring it into the 21st century, but to ensure that we honored Rose and Ben's dream and keep the spirit of their home alive. This was something that was extremely important to us throughout the year-long remodeling process. I feel like we accomplished our goal and very much hope that Rose and Ben are smiling down and are happy with the results too.
Thanks so much for stopping by and I hope that you have a wonderful day!!!