Wednesday, January 16, 2013

It’s a Wrap...Getting Crafty In My New Craft Room‼!

The renovations are still progressing at the house; however, we have been working on all the "behind the scenes" projects over the past 4 weeks (i.e. electrical, plumbing, HVAC, etc.), so there hasn't been very much visible transformations at the house like there was when we were doing demo and moving walls. Although this work is just as important…it is not nearly as exciting from a blog/picture perspective. However, I just received some of the best news that a girl can ever receive…I'M GETTING A WHOLE NEW CLOSET that was not originally called for in the plans‼‼‼‼‼! Que Jessee Spano – "I'm so excited! I'm so excited! I'm so, I'm so, I'm so (NOT) scared Zach!"

Saved By The Bell
Here

Please tell me you remember that epic moment from Saved By the Bell!  The new closet actually came about because of unplanned changes we have to make to the HVAC system. About a year ago, we had to replace our old air conditioner after it kicked the bucket, so we planned on keeping it even with the renovations because it was effectively brand new AC unit. However, with the additional square footage that we are adding to the house (i.e. the new bedroom, game room extension and dining room extension), our air conditioner unit is not large enough to service the whole house and we have to add another unit (one to service the upstairs and one to service the down stairs). No biggie right? WRONG‼! I have now learned that there are two rules with air conditioners: (1) air conditioners do not work properly if they are too small for the space they are servicing (totally makes sense), and (2) air conditioners do not work properly if they are too large for the space they are servicing (excuse me…come again?!?). Apparently, if an air conditioner unit is too large, it will cool down the space too quickly. This is a problem because the air conditioner will only run for a few a minutes and will not have time to properly circulate the air. In Houston, that means that the humidity will never be circulated out of the house which can lead to mold problems. ICK‼! So, long story longer, we are having to replace our current AC unit with a new smaller unit. It's frustrating…but every cloud has a silver lining right? So here is where the new closet comes in. Our HVAC system used to be the attic space above our bedroom, which is outlined in red below.

Craft Room 1


Since we have turned the attic space into the new fourth bedroom, we originally planned to keep the HVAC system where it was and just build a closet around it. You can see the HVAC closet below in red:

Craft Room 2
Well, now that we are adding in all new HVAC system, the AC man has moved the entire HVAC unit from the second floor into the attic…which means new closet for me‼‼ Woohoo! Once I found out about this new little slice of heaven, I immediately thought – Craft Room / Wrapping Room! The space is approximately 5 feet wide by 4 feet deep. I have been searching the internet for inspiration and just discovered the Martha Stewart Craft Furniture at Home Depot. OMG, the stuff is awesome‼! How I didn't know that she had an entire line of craft room furniture before this is beyond me. I love all the pieces in the collection, especially the 8 drawer flat filing cabinet:

Craft Room Furniture
Here


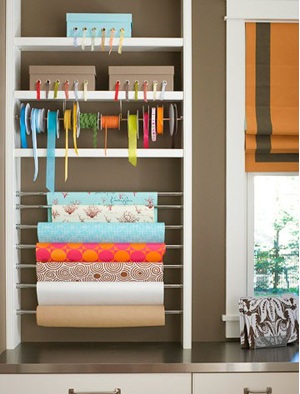
LOVE!!! This will fit perfectly in the closet and will be a great place to store all my tissue paper, boxes, tags, etc.  I think that it will also give me some space on either side of the filing cabinet for some baby shelves.  I also want to add some cool wrapping paper storage above the filing desk as well as some large shelves to provide a home where my crafting goodies can live.  I think this will help with overall organization, since the closet is such a small space. Here are some pictures of some super cool craft rooms and wrapping rooms that have inspired me.


Craft Room Furniture
Here


Craft Room Ideas
Here


Craft Room Storage
Here


Craft Room Ideas
Here
This little space is obviously a "work in imagination" for me…but I will keep you posted once I get a layout drawn up and have my color scheme in place. How about y'all…do you have a great craft room ideas or storage suggestions?  Please feel free to share them (or a link) in the comments below, because I would love to see your ideas!  Thanks for stopping by and I hope that you have a wonderful day‼!


post signature

Monday, January 14, 2013

Bathroom Organization

I have a confession, which will not come as a surprise to anyone who knows me, but I am an absolute DISASTER when it comes to organization and keeping a house clean and neat. I have had this problem for as long as I can remember. When I was growing up, the mess usually stayed in my closet…which would be piled to the ceiling with clothes and other "stuff" that I couldn't throw away. Ninety-nine percent of the clothes were usually clean…they just ended up on the floor when I would be frantically trying to get ready for school and couldn't find an outfit that worked. And what usually started out as a small mess that would take a short time to clean, would grow into such a huge disaster that I would become completely overwhelmed and not know where to start. So the mess would just keep getting worse and worse until I had no clothes left and had to clean the closet. I would always be so happy after getting the closet back neat and clean, but inevitably life would get busy and the cycle would start again, and within a few months I would be right back where I started. Unfortunately, this bad habit has followed me through college, law school, my LL.M and since I started working…and when you combine my disorganization with my crazy work schedule and tendency of never wanting to throw anything away (some might call it hording), you end up with large messes throughout the entire house. One of my major goals tied to this renovation, is to figure out a system that will help me become more organized and prevent anymore of these mess monsters from growing in our house. I know an organized house will help keep me less stressed and will make my husband (who is on the "neat freak'ish" end of the clean scale) much happier. So for the past couple of years, I have scoured the internet for tips and advice on how to organize a home and about a year ago, I discovered an amazing blog called I Heart Organizing, which in my humble opinion, is one of the most AMAZING organizational blogs around. Jenn has tons of great tips on how to organize any room in your house – from the closet to the kitchen – and I have adopted her blog as my Mr. Myagi during my journey of discovering organizational freedom.


Jenn has a few simple steps that she uses when organizing a space: (1) sort your items into categories; (2) purge anything that you don't use or need (by donating, selling or trashing); (3) figure out the proper home for the items you are keeping; (4) purchase any necessary containers so that everything can have a place; and (5) maintain the organization by setting aside daily, weekly and monthly maintenance sessions where you put items away and sort out anything that is not being used. Over the weekend, I decided to put this system into action and try it out myself. Since the beginning of the renovation, Matt and I have lived in a 600 square foot apartment because our entire is house is out of commission (i.e. no water, bathrooms, etc.). When we moved into the apartment, I brought all of my bathroom products, but never unpacked them. So for the past four months, they have lived in the dining area of the apartment…because, come on, why wouldn't bathroom products be stored in a dining room instead of the bathroom, makes total sense right? Well, according to my husband (and probably most normal folks out there) that answer is a resounding "NO!" However, due the lack of space in the apartment, Matt has been very accommodating (some might say enabling) and didn't complain because all the products were fairly sequestered out of sight. Although this wasn't that big of a deal when it was just my bathroom products, this area has also become the dumping ground of the apartment and what started out as a small eyesore, grew into a huge disaster:


Taking Jenn's advice, I started by sorting through all the items in the pile into three categories: keep, donate and trash (because nothing was worth selling). From there, I categorized all the keep items: clothes, kitchen, and bathroom…and am going to focus this post on my bathroom products. I then gathered all of my items in the actual bathroom and added them to the pile.


Once I had all of my bath products in one location, I sorted through the pile, threw out anything that was old or that I did not use, and came up with ten categories for the items that were left: (1) hair products; (2) face; (3) shower gels; (4) lotions; (5) hands & feet; (6) makeup; (7) hair dryers, curling irons, and straighteners; (8) medicine; (9) perfumes; and (10) miscellaneous (such as Mia and toothbrush chargers, extra cleansing brushes and toothbrushes, cotton balls, Qtips, etc.).


We only have a small vanity and linen closet in the bathroom. In order to gain some additional space, I moved all of the towels from the linen closet into the laundry closet, so that I could use the linen closet as additional storage space for my hoard of bath products. Here are some before picture of the bathroom and the laundry closet:


I then found some storage cubbies that I brought over from the house to help corral all of the products (gotta love shopping your house):


And then moved (1) the hair products; face; shower gels; lotions; hands & feet; makeup; and miscellaneous cubbies into the linen closet, (2) the hair dryers, curling irons, and straighteners cubby into the vanity and (3) the medicine and perfumes into the medicine cabinet:


I added some Martha Stewart labels from Staples to each cubby so that everyone would know what products go where:


I also tackled my junk drawer with these baskets that I picked up from Staples – three for a dollar…Holla‼‼:


And to keep the baskets from sliding around every time we open the drawer, I added these removable double-sided mounting stickers to the bottom of each basket to hold them in place:


And voila, I had an all new organized bathroom and no more bath products in our living room! Happy days, oh happy days‼! So let’s look at some great before and after pictures now:


I'm not gonna lie...I am pretty proud of myself at the moment. Now to make sure it stays this way! What about you guys, how do you organize your bathroom?


post signature

Tuesday, January 8, 2013

Tiling Decisions….

One of my absolute favorite additions to the house is our new laundry room. Before we started the renovation, our home had no laundry room and our washer and dryer lived in the garage. This was not that big of a deal since it is just Matt and me at the moment. However, the thought of having no laundry room with children made me extremely nervous…not so much the need to go outside to do the laundry, but the fact that we would have nowhere to sort, fold, iron, etc. all the mounds of laundry that come along with children's multiple costume changes. But thanks to the decision to move the stairs, we now have a perfect location upstairs for a fairly large laundry room, which you can see highlighted in yellow below:


On one wall we will have our washer, dryer, a hanging rod above to dry clothes, and a large floor to ceiling pantry to store all of our clothes washing accoutrements:


The opposite wall will include a sink, lots of built-in storage, as well as folding and sorting space above the lower cabinets:


I am so excited about all the storage and folding space that we are gaining. Since this room in an interior room with no exterior windows, we have to be contentious about our color palette to make sure the room doesn’t turn into a dark hole. To accomplish this, we have picked white cabinets to help keep the room nice and bright since they will be the dominate feature in the room. The countertops will be made out of the remainder of our cararra marble slab from the guest bathroom. We also have red GE front load washer and dryer, which are a dream! These bad boys can handle a king size duvet cover without even flinching. LOVE IT‼! However, they do impact the rest of the colors that we can use in the room. I need to hit the fabric store for inspiration…but have a few options that I am considering. First is a grey, white, and yellow pallet with a pops of red. I found these great lantern tiles as a possible option for the backsplash:


I love the shape of the tiles and think they will bring a lot of interest to the room. I also plan to add a tile "floor mat" like picture below in the center of the laundry room:


I know this is a bathroom, but it gives an idea of the direction I am heading. I would create the "floor mat" with these tiles surrounded by a simple thin grey boarder and large white porcelain tiles:


I would bring in pops of yellow and red with baskets on the two open shelves above the sink as well as other accessories and fabrics to help tie everything together. Here is an idea of how the tiles would look on both walls.


I might try to adding a boarder around the edge of the grey lantern tiles, like this:


These are Walker Zanger Ashbury tiles, which are AMAZING‼‼ However, they are a bit cost prohibitive to use in our laundry room, but they are going to make an appearance in our master bath as part of accent wall in our shower (which I will show you that in a later post). But for now, let me just take another quick moment to daydream about these little darlings….I love, love, love these tiles!


The second color combination that I am pondering is black and white, with pops of red and yellow. In this case, I would use black lantern tiles for the backsplash:


And use this fun mosaic I found to create the tile "floor mat":


I love the little flowers on that tile and think that they would make me smile whenever I went to do some laundry. Like the other color combo, I would bring in pops of yellow and red through baskets, accessories and fabrics. Here is an idea of how the tiles would look on both walls:


I really dig the contrast of the black tiles on the white cabinets and think they will also pop against the cararra marble countertops. But then, another part of me just wants to go off the deep end of the color pool and use this FABULOUS tile I found at Home Depot:


If I use this tile as the backsplash, I would keep the floor plain white, bring in a super colorful rug and use a mixture of colorful accents. This tile makes just makes me smile! And if you are have to be stuck in a room with no windows doing laundry, why not bring the outside in to brighten you day?!?! Well, there we are for now. But I would love to hear what you think...which, if any, possible tile options do you like the best? Thanks for stopping by and I hope you have a fantastic day!


post signature

LinkWithin

Related Posts Plugin for WordPress, Blogger...