Showing posts with label Design. Show all posts

Thursday, February 6, 2014

What Would Ralph Lauren Do?

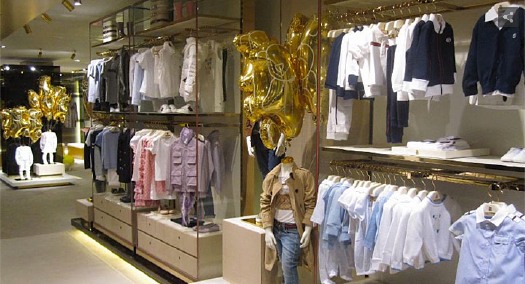
Hi everyone! We just got back from Italy for Matt's company meeting. Yeap, you read that right, company meeting. Seriously, it is one of the coolest perks of his job! His company's headquarters are in Florence where they have their annual sales/customer meeting, and I get to tag along. Woohoo! We usually try to go several days before or stay after the meeting to explore and have time to ourselves, and this year we did a tour to our favorites: Venice, Siena, and (of course) Florence. Although it flooded in Venice on our last day and was a bit rainy in Siena and Florence, we had an AMAZING time and it was so nice to spend an entire week with just the hubs. One of my favorite pastimes when we are in Florence is to simply stroll the streets and soak in all of the latest fashion trends in the motherland of style. I mean, when a country is the birth place of such fashion icons as Gucci, Prada, Valentino, Missoni, Brioni, Versace, and my personal favorite, Salvatore Ferragamo (swoon), even the children are mini fashionistas and play in the streets all decked out in their uber posh labels! Seriously, Gucci has a massive section in their flagship store dedicated solely to the bambinos:


In addition to the clothes, I also love classic Italian interior design and enjoy exploring the palaces to drool over the beautiful frescoes, chandeliers, furnishings and finishes:


And you can also find some amazing design elements in many of the hotels, like this fabulous rug and the beautiful Murano glass chandelier:

2671_reception2

Or the mix of the classic moldings, regal linens, Murano sconces, and modern mirrored chest:

2674_camere3

When selecting the finishes for our house, I tried to incorporate some of the design elements that we have found overseas during our travels. Like the dark wood trim and light walls in the Grand Hotel Baglioni's hallways (oh, and who can miss that AMAZING ceiling...hello lover!): 


Does that paint and trim color scheme look familiar?
 

But as much as I love Italian decor, it is just a ttteeeeennnnssssyyy bit too glitzy for our house and not nearly approachable or cozy enough for everyday life. Instead, for our home, I want the furnishings and decoration to give me and my guests a feeling of warmth and welcome (like being wrapped in a hug when coming into the house)...and I find myself constantly drawn to English-inspired design, with its beautiful wooden antiques, bright rugs, and tartan fabrics. Don't get me wrong, I still love glamor and drama, and absolutely plan to incorporate that into the house to keep things fresh and for some added flare. And to me, when it comes to taking classic furnishings and infusing them with a modern twist and a pop of glamour...no one does it better than my personal design Mr. Miyagi - Ralph Lauren. And his Apartment No. One collection is spot on with my vision:

 
In this collection, Ralph, or Mr. Lauren if you're nasty (NASTY! Nasty boys, don't mean a thing! Bomp bomp bomp da la bomp bomp, Oh you nasty boys! Gotta love some Janet!), has masterfully mixed classic elements likes the black chesterfield couch, the red and navy oriental rug, the tartan chairs, fabulous moldings and crystal chandelier, with modern pieces like the black lacquered chest, the sleek wood coffee table and the cheetah print throw pillow. Perfection! And here are a few more pictures from the Apartment No. One collection:
 
http://www.ralphlaurenhome.com/collection/2013_Fall/AptNoOne/default.aspx?collId=202

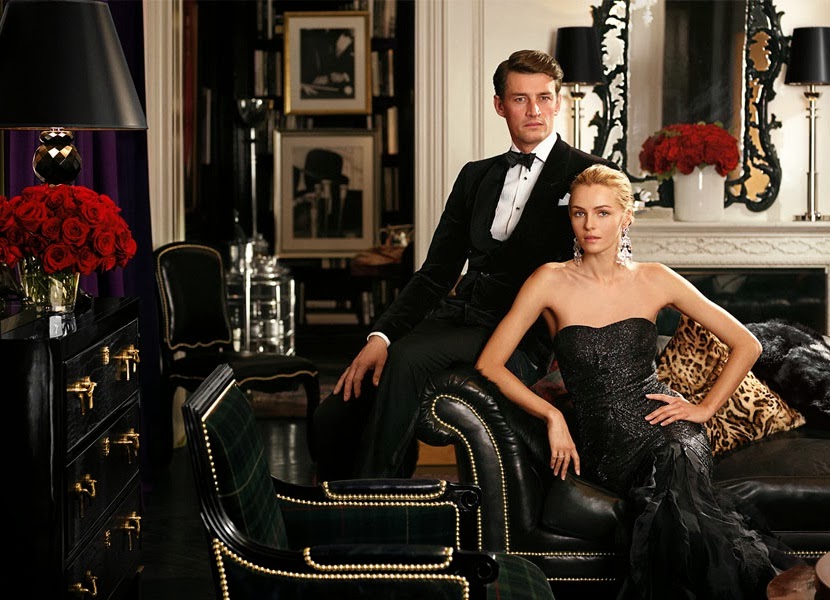
The mix of the black furnishings, gold trim, white walls and red roses in this picture are is so glamorous! To me, this room looks like it was pulled out of a 5th Avenue apartment in NYC.
J'ADORE!


And how cute are those dogs!  I also love the mix of tartans, croc, and leather in the dining room below:


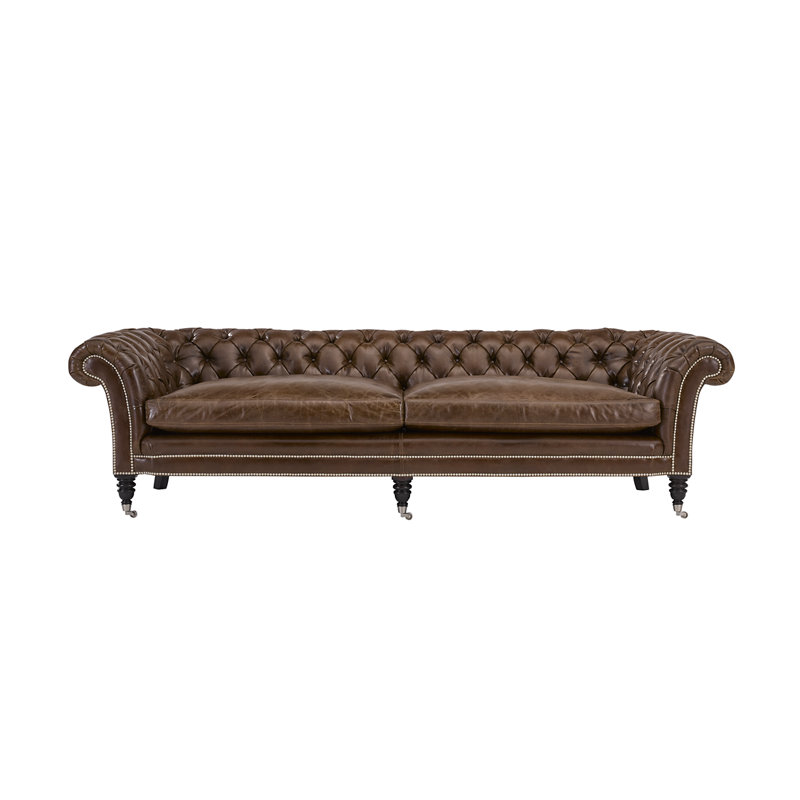
Oh those pictures just make me happy! And the best thing about Ralph Lauren and the Apartment No. One collection, is that Matt loves it too!!! We actually 100% agree on this (shocking, I know)! So now that we have been back in the house for a few months and have a better feel of how the new layout will work, we are starting to look for new furniture to take over for our parents' hand-me-downs, and our motto for the project has been WWRLD (i.e., "What Would Ralph Lauren Do?"). Here are some of my favorite pieces from the Apartment No. One collection. The chesterfield couch (i.e., the Brook Street Tufted Couch):


the New Bohemian Cocktail Table:

http://www.ralphlaurenhome.com/products/furniture/item.aspx?haid=62&collId=&shaid=&sort=&itemId=10373&phaid=

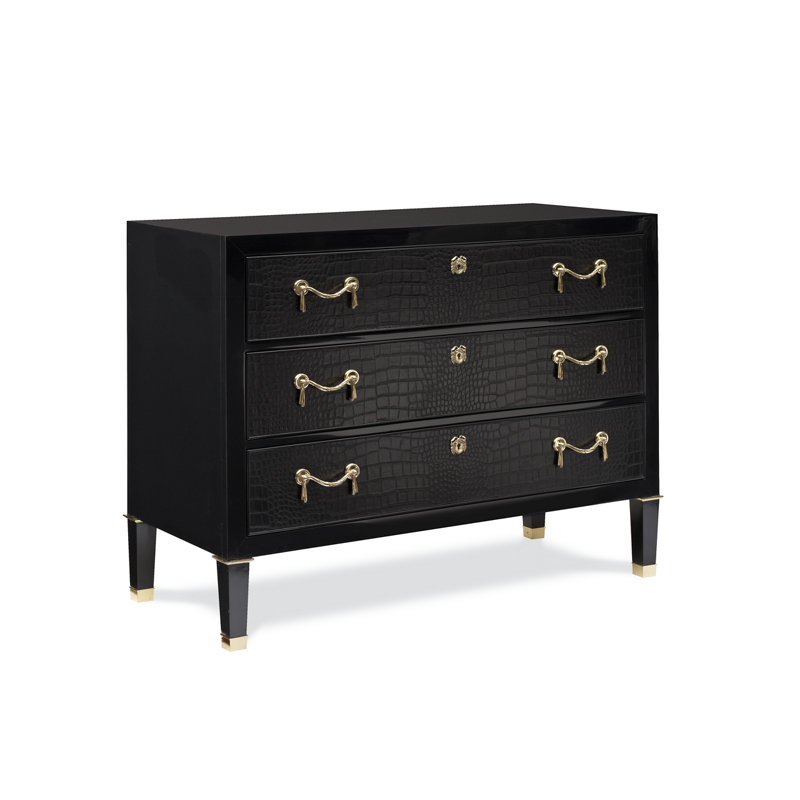
the Brook Street Chest:
 

the Cannes Gueridon Table:


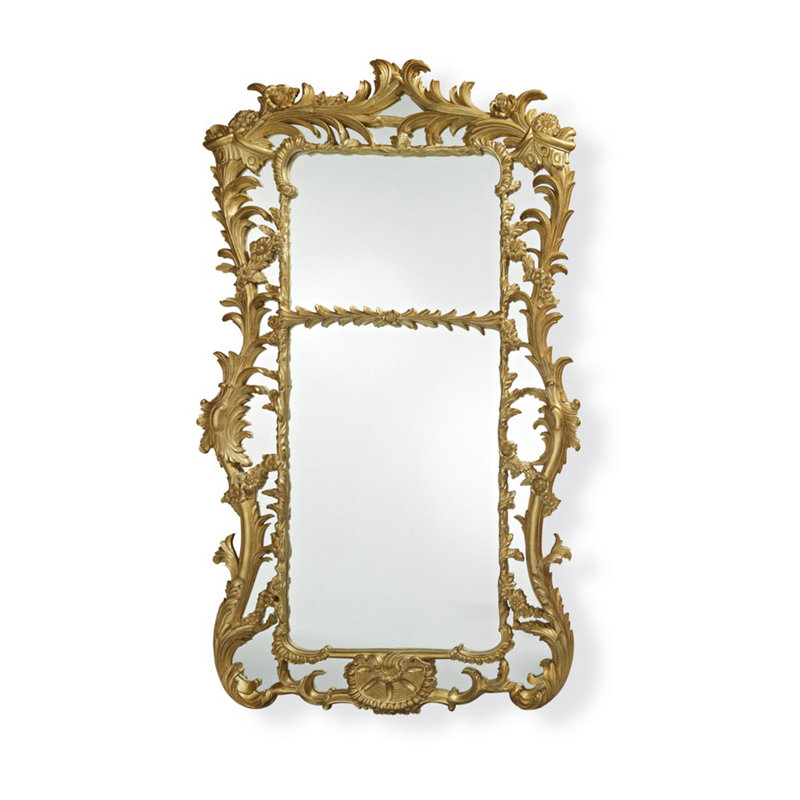
and the Bishopgate Mirror:


And for any Downton Abby junkies like me...this mirror is featured in the dining room this season (since Ralph Lauren is one of the sponsors). I don't have a screenshot now, but will post it tonight! However, no matter how gorgeous they are, the simple fact that they are Ralph Lauren makes them SUPER EXPENSIVE (like, you could buy a car for the price of any one of these little beauties...OUCH!!!). So needless to say, although I adore all of these pieces, they won't be making their way into our casa anytime soon. Instead, I am using them as my inspiration and have now commenced the "Great Furniture Hunt of 2014" to try and find some equally fabulous but substantially more affordable finds. It's going to be tough, but wish me luck! I will keep you posted as I go. So ladies and gentlemen, start your engines and let the shopping commence!!!


Wednesday, January 15, 2014

Vintage Bathroom Makeover {Part 4}


Happy hump day everyone! I hope that you are having a fantastic day so far. Things are fab here! I survived the "Great Disaster Room Cleanout of 2014" and will show you the updates this week. It is amazing what 14 hours of hard labor can do for a massive mess! So that is one step closer to being really moved into the house...and I am so excited! I wanted to stop by today to show you where we are with the guest bathroom. Last time we checked-in, I showed you the floors, wainscoting and subway tile shower surround. So today, I wanted to show you the latest version since all of the "hardscape" is in and we are now just left with accessorizing. Happy days!!! As a reminder, here is the upstairs floor plan before we started the renovation and the guest bathroom is highlighted in yellow: 
 
As I have previously mentioned, one of the main reasons for our renovation was to update and enlarge our tiny bathrooms. Although the bathrooms had a fun vintage look, it was not the look we were going for. Here is what the vanity area looked like before the renovation:
 
 
And here is what the shower/toilet area looked like:
 
 
So as you can see, super dark and super tiny!!! In order to make it so that two people could get ready at the same time, we decided to make a separate vanity area and a separate shower/toilette area. Here is the floor plan for the remodeled second floor and the new bathroom is highlighted in yellow:
 
As I previously mentioned, we were going for a 1920's vintage feel with carrara marble, white subway tiles, and dark cabinets. This is the original mood board that I made for the bathroom:
 
 
And here is how she turned out! This is a view looking into the vanity area from the shower/toilet room:
 
 
We have a double vanity on the right side of the room. And on the left side, we have two floor to ceiling linen cabinets. This is a fairly tight space, but between the vanity and the two linen cabinets, we have a TON of storage!!! We also added the white wainscoting to give the room a tailored look and chose a cool grey to play off of the carrara marble counter tops.  One of my favorite features of the bathroom though is the basket weave tile "floor mat" that we added in the vanity area:


I absolutely LOVE the way that it turned out!!! To me, the floor gives a super retro vibe and is a fun surprise. And please excuse the quality of the following picture, but here is what the bathroom looks like when you enter from the hallway.


You can't tell from that picture (because I was using my IPone), but there is about an 8" space between each side of the vanity and the wall...so the vanity actually looks like a piece of furniture as opposed to a built-in cabinet. Now moving onto the shower/toilet room.  In the shower I chose white subway tile for the shower surround, a large goose neck shower head (because there are many 6'4"+ men in my family that will visit), and a hand shower that I can use to more easily bath children (once they join the picture):


In the middle of the shower, to break up some of monotony of the subway tiles, I added a framed herringbone feature. 


 I am so excited with the way it turned out! I think it is super elegant with a splash of fun. And on the back side of the shower we added a train rack to hang robes and store towels for our guests:
 
 
The train rack is so pretty!!! It makes me not want to hang a shower curtain so that I can see it all the time.  And as you can see from the picture above, I also added a little bench at the end of the tub. I thought this would be a great place to sit when bathing kiddos and also will be a nice place for them to store their bath toys. So there you have it folks! I still have a ton to do with all the accessorizing, but have made huge progress! And speaking of progress, lets check out a couple before and afters shall we?!?!?!


And one more of the shower area! So much better!!!!


 Thanks for stopping by and have a wonderful day!!!
 

Tuesday, October 15, 2013

Halloween Invitations {2013} - A Wizard's Workbox


Hi everyone! I hope that you had a wonderful weekend. Ours sure was busy and was filled with a fantastic wedding, football and lots of work-work for me. Good times! I also finally finished putting together our Halloween party invitations! Every month, a small group of our friends tries to get together for a dinner club. They are a ton of fun. It's a potluck, so everyone brings a dish, and they usually have some sort of theme. I was absolutely thrilled when I drew October out of the hat, because that meant that I finally get to put into action my plan for a super fun Halloween invitation that has been dancing around in my head for about a year now...ever since I discovered Mrs. Limestone's AMAZING Halloween invitations over at Brooklyn Limestone. Y'all, she is so creative and comes up with absolutely fantastic invitations and parties for Halloween year after year. I have spent many an hour drooling over her fabulous fĂȘtes! Stephanie's Creature Survival Kit was my initial springboard of inspiration for this years invites. However, instead of a Creature Survival Kit, I drew additional inspiration from my all time favorite books Harry Potter and made a Wizard's Workbox for my guests.
 
 
Each guest received a box filled with all sorts of goodies to get them ready for All Hallow's Eve. Tomorrow I'll show you how I made the Wizard's Workboxes, so for today, let's just check out what fun they contained. After opening the Wizard Workbox, our guests were first greeted with the invitation:
 
 
It's the time of the year
For scares and frights,
Where witches swarm the skies
And vampires haunt the night.
 
To protect you from these dangers
There is an ode that you must give,
In honor of All Hallow's Eve
While the ghosts and goblin do live.
 
The eighteenth of October
Is when our celebration begins,
Please share in the libations
With your most fiendish friends.
 
The demons are unforgiving
And their mercy can't be bought,
So to forget about this party
Let's just hope that you dare not!

Once the invitation was removed, our inspiring wizards found three cards to guide them through the content of their workboxes:


And here is what each received:


First, in honor of Snape, each Wizard received their own bottle of Disappearing Potion and instructional card:


That provided:
 
As you start your journey,
Here's some potion you can take.
To hide you from the monsters,
Since your safety you can't forsake!
 
Each bottle of Disappearing Potion also provided a special warning:
 
"To Hide You From Your Enemies, And Possibly Your Friends. Because When Evil Comes A Lurking, Who You Can Trust Will Just Depend"
 
My next bit of inspiration came from Mad Eye Moody, and particularly the scene from the Deathly Hallows where Dolores Umbridge kept Mad Eye's "All Seeing Eye" on the peep hole of her office to keep a close eye (literally) on the workers:


The card provided:
 
Remember to look behind you
And also watch the skies,
Since evil can appear from anywhere
Try wearing this "All Seeing Eye".
 
My next Harry Potter inspiration came from the Maurader's Map.  Unfortunately, as hard as I tried, I simply could not make the map disappear no matter how many times I whispered "Mischief Managed!"


So instead, I made sure to provide our guests the following guidance:
 
And finally a map to guide you
As you make your way.
But the terrors will be following,
So make haste and don't delay!
 
Once the map was opened, guests found that it had been soaked in blood, EEK!!!! 


And provided its own special warning:
 
Some blood has been left over
From the previous owner of this map,
So move quickly towards the "X"
Before your juices too are tapped!
 
And last but not least, to ensure that our young wizards did not forget this ever important event, I gave a nod to the Queen of Halloween, Mrs. Martha Stewart and made my version of the "Don't Forget" box:


So there you have it boys and ghouls! I hope that you enjoyed the invitations, because I had a blast putting them together!


 Don't forget to swing by tomorrow when I give you the low down on how I put my Wizard's Workboxes together.  In the meantime, Happy Haunting Y'all!!!


Thursday, September 5, 2013

Happy days, oh happy days!!!!

It's here, it's here,
Let's give a cheer!
To the most wonderful day,
Of the year!
 
"What's going on?"
"What's that you say?"
"Why are you so excited?"
Because, IT'S MOVE IN DAY!!!
 
That's right people! After 371 loooooooong days, we are FINALLY moving into the house!!!!
 
 
I am so excited that I don't even know what to do with myself...it can't only be expressed through Napoleon's display of pure joy and happiness!
 
 
We had three truckloads worth of stuff to move in and four guys knocked it out in 3.5 hours.  Let me tell you, movers are worth their weight in gold!!!
 
 
Although the movers got everything into the house...it is our funfilled job to unpack it all and put THREE TRUCKLOADS worth of crap stuff into our beautiful new home (well in my opinion at least...but hey, this project has been a year so it's like the house is my baby...and it will always be beautiful in my eyes no matter what anyone says)!  I will stop back by tomorrow with some pictures of the destruction that is now the inside of our house and the game plan to organize, purge and put away all of our worldly belongings.  But for now, let's reserve this day for happiness and dancing shall we? If you need me, I will be in the front of the house celebrating...just look for the pink tutu!


Friday, August 30, 2013

Fireplace Makeover

 
Happy Friday! I hope that it has been a great week for everyone! Tomorrow is the first day of college foot and I couldn't be more excited (especially since Mr. Manziel is good to go and can start the second half of tomorrow's game - SCORE)!!! So fingers crossed that it will be a good game and not too sweltering hot (Bahahahahahah...not hot in College Station in August, good luck with that one). So much is happening at the house right now trying to get it ready for our move-in day. We passed the plumbing and electrical inspections today - WOOHOO!!! We also started the fireplace remodel. Here is what she looked like originally, right before we started the remodel:
 
 
The first problem was the massive hearth that stuck out about 16" from the front of the fireplace and wrapped around the side. Unfortunately, that was just way too much valuable real estate being wasted for me, so out it went! The second issue was the weird large cubbie to the right of the fireplace. Being from Houston where we might get one fireplace-worthy-day a year, Matt and I had no idea what that space was used for...and thought it was just a strange cubbie. We lived in the house for three years before one of my friends that lives up north happened to stop by and informed us that is where you are supposed to store your wood. Seriously??? How much wood does one person need (that's what she said)????  Here is what the fireplace looked like after we removed the hearth and added built-in cabinets to the right in the old wood storage cubbie.

 
Oooo, and gotta give a quick shout-out to the new floor color. I am so digging the dark chocolate brown. Yummy!!! So now back to the fireplace, the third problem came to light as the remodel progressed.  Although the Old Chicago brick was great in the house originally, it did not play well with our new cream walls, dark trim, and dark wood floors...it just came across too orange'ish-pink'ish-salmony (if that's even a color).  We first pondered white-washing the brick, but felt like that still wouldn't fit in with the rustic-glam look we are going for in the living room.  So we decided that our best option would be to cover the brick with dry stacked limestone. This picture below gives you an idea of what I am envisioning - a combo of elegant and rustic (and P.S. I L-O-V-E this living room, it is FAB!!!):
 
Here
So here's the game plan to beautify the fireplace and bring it in line with our current decorating scheme:

1. Remove massive hearth
2. Pick out limestone
2. Cover Fireplace with dry stack limestone
3. Add new rustic/reclaimed wood mantel
4. Add plug and cable for future TV
 
Our slab of stone arrived yesterday.  We chose a cream limestone overlay that will sit right on top of the existing brick. It is reading a bit yellow in this picture, but is much more cream in real life with just a bit of Edward-style sparkle (mmmmm....gotta love some good ol' fashion vampire sparkle): 

 
So now that we have the limestone and have removed the hearth, the next step was to cover the existing fireplace with a layer of skim coat to give it a nice even base for the limestone to overlay.  We also added a plug and a cable cord so that we can put a TV above the fireplace if we want in the future...and in the meantime, they will be covered with a painting, so our guests will be none the wiser of the electrical storm going on just out of eyesight.

 
That is as far as we have gotten.  I will pop by next week with an update on the final product.  I hope that everyone has a wonderful Labor Day weekend!!!  Thanks so much for stopping by!


LinkWithin

Related Posts Plugin for WordPress, Blogger...