Hi guys! Well it's Thursday and I hope that you are ready for Mother's Day this Sunday! The weather has been amazingly beautiful here in Houston this past week and I am hoping that it stays that way throughout the weekend. We are enjoying that last bit of cool before the sweltering summer heat that Houston is famous for hits. So fingers crossed that it continues in honor of all the awesome mamas out there! And speaking of enjoyment, we are also continuing to enjoy progress at the house. Things are starting to move at a fast pace and our new move-in date is set for June 27th. Considering our original move-in date was December 15th, I'm not holding my breath...but hopefully everything will continue smoothly and we will be back home in time for July 4th! One of the areas of the house that has seen a lot of progress is the upstairs guest bathroom. We have the cabinets installed and they are getting ready to start on the tile. However, before jumping in on those pics, I wanted to first show you the state that this poor little room started when the demo began. In one of my first posts, I told you that two of the driving motivators behind this renovation were the dangerous stairs and the tiny bathrooms. Both bathrooms (we had one upstairs and one downstairs) were mirror images of each other and had a toilet, sink and tub. However, they were only about five feet wide (I could seriously touch both walls when standing in the middle of the room) and were only functional for one person at a time. In this floor plan, you can see the bathroom highlighted in yellow and can also see the general layout of the room.
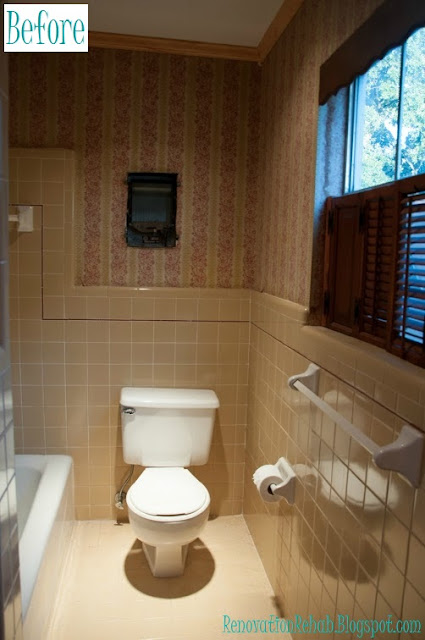
Not only did the layout of the room need help, but it's design was born in 1967 and apparently had a serious case of "failure to launch"...so all the finishes were in desperate need of updating! Seriously, the bathroom had mustard yellow tiles with maroon accents, red and mustard yellow wallpaper, linoleum floors, and dark wood cabinets and wood shutters. I am sure she was all the rage back in the 60's, but it was high time this little gal got a makeover and was brought into the 21st century. So without further ado, here is what our little guest bathroom looked like when you first entered the door.
You had a small linen closet to your left and an angled sink on your right. Then, once you turned the corner, you had the shower on your left and the toilet on your right.
You can see in the pictures that we had added crown molding. We did this when we first moved in when we thought that we would just freshen the room up a bit by removing the wallpaper and giving it a new coat of paint. However, that wallpaper was applied with 1967 wallpaper glue, which will not be removed without a major fight. So we never painted the crown and it went to the large dumpster in the sky along with the rest of the carnage once demo was complete. But I digress, so back to the tour. Here is the view of the sink from inside the shower.
And this is a view looking around the shower wall back towards the entrance of the guest bathroom.
And finally, here is a close-up of the wallpaper. Like I said, it must have been FAB-U-LOUS back in 1967, but fast-forward 45 years...and it was TIRED and needed to go.
Just outside of the guest bathroom, there was an entrance into unfinished attic space. This is where the A/C unit lived and where we stored our luggage and other items that were not heat/cold sensitive. You can see the attic space highlighted in yellow along with the guest bathroom in the floor plan below.
And in this photo, you can see the entrance into the guest bathroom on your left and the entrance into the attic space straight ahead.
Here we have a view of the inside of the attic space. This area is about five foot wide and, since it butts right up to the bathroom, I thought it gave us the perfect opportunity to expand the bathroom.
Since this is currently the only upstairs bathroom, I wanted to create two separate rooms in the space: (1) a room with the shower and toilet, and (2) a room with the vanities and linen closets. By putting the shower and toilet in their own space, it allows for two people to get ready in the bathroom simultaneously - one in the shower while the other finishes up in the vanity room. You can see the bathroom highlighted in yellow below and the general layout of the space.
So now that you had the tour, I thought I would leave you with some fun demo pictures...here we go!
Ba-bye vanity and miniature linen closet!
Adios mustard yellow tiles!
And may you rest in peace sweet wallpaper. You had a good run...but it's time to dim the lights and say goodnight!
So that's all for now. I will follow-up with the post-demo pics and the new cabinets soon! In the mean time, thanks for stopping by and have a wonderful Mother's Day weekend!!!
.jpg)


.jpg)


+(clean).jpg)


I am very astonished by the data of this blog and i am happy i had a look in excess of the blog. thank you so much for sharing such great data.
ReplyDelete