Showing posts with label Dining Room. Show all posts

Wednesday, July 17, 2013

Let the Painting Commence!

Hello everyone! I hope that you are having a great week so far! We just returned from an amazing trip to London, Paris and Bordeaux for one of my dear friend's weddings. The wedding was absolutely BEAUTIFUL and it was so good to spend some time with our Aberdeen friends who we haven't seen for far too long! The renovations continued at the house while we were gone, with tile being installed and the long painting process commencing. So far, the painters have focused primarily on all the wainscoting and trim.  Last week, I showed you the primed and sanded wood work...but now, we have first coat of paint to the wood work as well (the walls and ceiling paint will come next).  It is really cool to see our color pallet finally coming to life!  In the words of Homer Simpson...can I get a "WooHoo"?!?!?! 
 
 
But before we check out the paint, here are the colors that we have picked for the house:
 
 
So now, onto the dining room and the living room. As you can see in the picture above, we are painting the wainscoting and trim a dark brown color called Bronzetone 60 from Benjamin Moore.  Here is a view of the dining room from the living room:
 

I love the rich color of the wainscoting. However, to keep the rooms from turning into black holes, are going to paint the walls a dark cream color by Ralph Lauren called Plaza Blanca.  The color is from their suede collection which will also give a subtle texture to the walls.  Here is another view of the dining room and the painted wainscoting. 


On the stairwell, we are using a custom cream color for the wainscoting. We chose to paint the stairwell cream because the color scheme upstairs is different than the color scheme downstairs...specifically, we are going to have bright white wainscoting and light gray walls upstairs.  So, in order not to have such a drastic change from downstair's cream walls and brown wainscoting to the upstair's gray walls and white wainscoting, we are using the stairwell as a transition area and will have cream wainscoting with the same Ralph Lauren Plaza Blanca color on the walls.  Here is a picture of the stairwell...although the color isn't showing quite right (it is more cream than white). 
 

Here is another picture of the stairwell where you can see the wainscoting a bit better.


And here is the upstairs hallway with all the wainscoting, baseboards and crown molding painted.
 

We are also painting the wainscoting in the reclaimed attic bright white. And in this picture, you can see the hidden doors that open up to major storage in the eaves of the attic.


And here is a picture of another upstairs bedroom. 

 
We previously painted the walls blue (I was going for a Wedgwood look) and are keeping the same color scheme.  However, we are repainting this room because we had to fix the chair rail and baseboard when we relocated the entrance door.   I LOVE the combo of the blue walls and white trim..it is very peaceful and relaxing to me.  So that is all for now.  I hope you enjoyed seeing the painting progress that we are making around the house. Thanks so much for stopping by! 
 

Wednesday, June 26, 2013

Wonderful Wainscoting


Happy Wednesday everyone! I hope that you are all having a great week so far.  I can't believe that June is almost over and we are going to celebrate the fourth of July next week! Between being slammed at work and trying to get the house finished, this summer has absolutely flown by.  We are continuing to make progress at the house, and are still aiming for an end-of-July move-in. Woohoo!  But enough about move-in dates...let's dish about my latest crush at the house....our delish wainscoting!  Ever since we bought the house and I started dreaming of renovation ideas, I knew that wainscoting would be incorporated into the mix.  I absolutely LOVE the look of traditional wainscoting and how it can add some glam and class to an otherwise ho-hum room.  Like this beauty...can I say "Hello LOVER!!!!"

Here
I also love how amazing full-wall wainscoting looks when paired with retro dental molding...100% drool-worthy in my book:


Although we did inherit wainscoting when we purchased the house...it wasn't exactly what I had envisioned.  Here is our living room/dining room/entryway in all of its retro 1960's paneling and wallpaper glory:


And here she was after a couple of coats of neutral paint: 


Although she was brought a bit closer to the twenty-first century with some neutral paint...the look still wasn't living up to the wainscoting visions dancing in my head.  But hey, that is what this reno is all about...taking a house whose footprint we loved and making it our own! So without further ado, let's check-out the progress that we have made on my wainscoting dreams.  Here is the dining room after it was extended five feet and the walls were taped and floated:


And here is another view of the dining room after walls were fully primed:
 

Although I think the room looks much better than it did before, it still didn't have a wow factor.  So here is the dining room today with the wainscoting and trim installed:


And here is another view looking towards the front windows:


We continued the wainscoting up the stairs...which I talked about here and here with the staircase reveal.


But we didn't stop there.  Remember the long upstairs hallway that connects the stair landing with the bedrooms and guest bath:


Well, not to be left out, she also got a fashionable upgrade with some lovely wainscoting too:


And last but not least, we updated the wainscoting in the room above the garage....but that wainscoting has a special surprise, so I will show it to you in a second post this week! Seeing all the wainscoting makes me giddy like a school girl!  I can't wait to see what it looks like once it is painted and the walls have some color. What about you guys, does anyone else love them some wainscoting? Thanks for stopping by and have a wonderful day!!!


I am sharing this post on Blackberry Vine, Crafty Confessions, Home Stories A to Z, Today's Creative Blog, Coastal Charm, Elizabeth & Co.

Thursday, May 2, 2013

Reclaiming Salvaged Hardwood Floors

Happy Thursday everyone! It's been a crazy week, but the Rockets won tonight, which has suddenly made it an exciting series here in Houston. I am 100% game for a time warp and reliving the Clutch City glory days of the Rockets from 1994 and 1995.  I can't believe its been almost twenty years since we won our last championship...cause lord knows I was a mere toddler when that happened (or eehem, excuse me, I meant a teenager).  How time flies! Well, speaking of time flying, we are now firmly in the ninth month of a four month renovation project...oh joy.  However, the old adage that "good things come to those who wait" is starting to come to life at the house, because the reclaimed wood floors have now been installed downstairs and look great. Holla!!! One of the things that Matt and I absolutely adored when we bought the house was that it had wood floors throughout (except in the bathrooms and kitchen where 1960's tile and linoleum lived - pretty).  Here's a look at the floors in the living room before we started demo at the casa.


And here is another view looking towards the living room and kitchen.  This was when we were waiting for the movers to come and take all of our junk stuff to storage.

 
We are keeping the wood floors throughout the house, but have to add new floors where we extended the front of the house, where the old stairs were previously located, and in the vestibule entrance to the master suite.  The areas where we need new floors downstairs are highlighted in yellow in the floor plan below. 
 
 
The existing floors were original to the house.  This created a bit of a problem because you can't just buy new wood floors from the local hardware store and expect them to match twenty-five year old (well loved and well worn) floors.  In addition to the difficulties caused by the age of our floors, each piece of flooring has these super cool pegs at the ends that Matt and loved and really up the vintage feel.  You can see the pegs in the picture below (please excuse the white mess, this picture was taken right after they taped and floated the drywall).
 

Apparently they do not make wood floors like this anymore kids.  Accordingly, we had to find salvaged wood floors that we could re-purpose for our home. And boy did we hit the jackpot.  We were actual able to find a ton of wood that matched exactly.  Score!!!


Here's another picture of our reclaimed wood floor loot!


The process of installing the floors was like putting together a giant jigsaw puzzle.  Since the salvaged wood floors came from various different locations, the guys had to hunt through all the pieces to find ones that matched perfectly when laying them down. Here's the installation process in action the dining room and foyer extension.
 

And this is what the floors look like after being installed. You can see where the new floor was installed because of the color change.


Here is another view of the newly installed floors looking from the dining room into the living room.  You can also see where they added the new floors to the right of the staircase (that is where the old stairs were located).


And this is one last view from the back corner of the living room looking towards the front of the house. You can hardly see a difference from this angle.


However, as you can see from the other pictures, not all the salvaged wood matched our current floors exactly.  That is where the floor re-finishers come in.  The process of refinishing floors is quite step-heavy and labor-intense.  According to the Cliff'sNotes version, they first sand down the floors, then cover the floors with wood filler, then stain the floors, and then finish the floors with a several coats of polyurethane for protection.  In all honestly, I didn't believe that they would be able to make the miss-mash of floor pieces match our existing floors no matter how much they sanded or stained them.  So the builder brought in his guy to prepare a sample for us...and let me say, I was shocked at the difference!  The picture below shows the refinished floors inside the blue box and the unfinished floors to the left and below the square. Wow, what a transformation!  This little section is nearly ready for its close-up darling! I am definitely a believer now (cue the Monkeys "I'm a believer I couldn't leave if I tried..da na na na")!!!!


They still will have to add all the wood pegs to the boards that don't have them.  Also, we are going to stain the floors a darker color, but we haven't figured out the exact color yet.  I am thinking something like this though:
 
 
I dig the fact that the color is on the darker side but retains the warm rich undertones and highlights the beautiful grain in the wood (which I think we would loose if we went with a super dark stain like a java color).  So that is all for today.  I hope you enjoyed seeing our floor progress!  Have a wonderful day and thanks for stopping by!!!


Tuesday, December 4, 2012

Room With A View

We are continuing to make major progress at the house, which is extremely exciting! The crew has extended the first floor's exterior wall, removed the old dormer, and made a HUGE hole in the roof where the new large dormer will live. You can see the floor plans for the remodel here and here. As a reminder, the picture on the left is the front of the house before we started the remodel. And the picture on the right is where we are currently...what a difference!


This remodeling business is not for the faint of heart. You can see in the picture above that the crew has also removed the old cedar siding above the garage, which will be replaced with Hardy Plank. Here is closer view of the new exterior wall and the hole for the new dormer.


We extended the first floor's exterior wall in order to relocate the stairs (the blue prints are here and here). We are replacing the front door and will add side lights. We are also able to put in two large windows in the dining room. In the picture on the right, you can see the location of the new front door (the hole on the left) and the placement of the two dining room windows (the two large holes on the right). And the picture on the bottom is a close-up of the location of the new dining room windows.


Here is some of the carnage from the demo…these used to be the old single-pane windows in the dining room. Can't wait to see the new ones!


Now let's step inside. The picture on the left is the dining room before the extension, and the picture on the right is the dining room and entry after the extension. You can see where the old exterior wall used to be based on the floor in the dining room and entry. The walls in the middle of the room are two temporary walls (which are currently supporting the second floor) and will be removed.


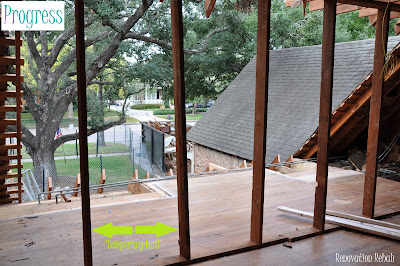
Now, let's chat about the new dormer. We are enlarging the dormer for two reasons. First, the room where the dormer is located is the game room. Before the renovation, the game room was a large room measuring approximately 15' by 22'. However, the front third of the room was not usable space because the roof is angled (which makes for a very low ceiling in the front third of the room). This effectively made the room 10' by 22' (super long and skinny). Enter new dormer (and see the blue prints here). By adding the new dormer, not only are we are able to extend the exterior wall of the game room five feet (which lines up with the extended first floor exterior wall and increases the game room to 20' by 22'), but now we will have 8 foot ceilings throughout the game room (which effectively gains us 10' in the room – the 5' extension + ability to use the 5' of the previously unusable portion of the room). The pictures below shows the game room and the angled roof. The picture on the left is looking into the game room from the door and the picture on the right is taken inside the game room back looking towards the door.


On a side note, the walls of this room used to be covered with brown wood paneling and some sweet navy blue wall paper with a vintage colonial theme. Unforuantely, I don't have a picture, but the wallpaper below will give you an idea (just picture it with a navy blue background and add colonial drums between each of the eagles). When we first moved into the house, we removed the paneling and wallpaper, added the crown molding and the new window seat, painted the walls with Ralph Lauren suede, and painted all the trim dark brown. It was pretty painful to see all that work destroyed. But hey, sometimes you have to take a step back in order to move forward.


So back to today. The picture on the left shows the view of the game room from the new stairs. And the picture on the right gives you an idea of game room's old footprint and the space that the new dormer will create.


Here are some more pictures of the game room from the inside. I've heard of open concept…but this is rediculous! Sorry, I couldn't help myself.


These pictures show the game room looking back towards the stairs from the far wall of the game room. The picture to the left is before any demo and the picture on the right is today. You can see where the old door used to be located and where the new entrance will be in the picture on the right.


Here are our new stairs in action!


And some more views of the front yard from opening of the new dormer.


Oh, and here is a close-up of our lovely dumpster. We have unloaded this bad boy about 15 times already!


We'll be back soon with the progress pictures of the new guest bedroom!

post signature

LinkWithin

Related Posts Plugin for WordPress, Blogger...